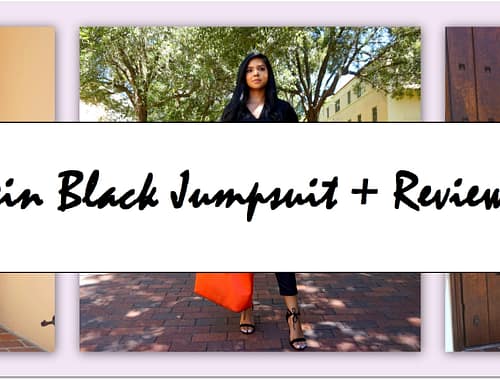
SheIn is a clothing company offering cute and chic pieces for young women and teens! I ordered and received their black jumpsuit and I thought it was beautiful ($18)!

SheIn is a clothing company offering cute and chic pieces for young women and teens! I ordered and received their black jumpsuit and I thought it was beautiful ($18)!

First things first, you have to take a picture (duh!). But what camera should you use and does it actually make a difference? I think Apple definitely stepped up their game when it came to the iPhone 7 camera. However, I feel that the camera still isn’t where it needs to be and the quality is not as amazing as I’d expect. Compared to other phones like the Samsung and the Google Pixel, the camera just doesn’t perform as well. It also doesn’t capture details like a professional camera would. Professional cameras show pictures with more clarity and sharpness than a regular iPhone. It’s also easier to edit pictures that are taken by a professional camera because of the higher picture quality. (I really want a Nikon but I don’t have one just yet). See below for a picture taken by my uncle’s Nikon. I'm late but …. here's my Eid outfit 🙂 #tbt? . #eid2017 #kaftan #sparkles #ootd #white #navy #navyhijab #veronascarves #bloggerstyle #bloggercrave A post shared by S.✨ (@sayeedah_) on Jun 29, 2017 at 8:15am PDT

I am SO glad my family decided to go to Puerto Rico this month! Totally needed a vacation before school starts up again! Puerto Rico is beautiful, even though it’s just as hot (if not hotter) than Florida. The flight was about 2 and a half hours. It got delayed which was a bummer because it cut into our plans but that’s okay. It was still an amazing trip nonetheless.

I talk about makeup a lot on my blog, but I never really talk about removal! My friend requested this post and I thought it was such a good idea! Good skin is the key to good makeup!
So many brands have setting powders – how do you know which ones to choose?! From watching a bagillion reviews on Youtube, I narrowed it down to these two: the Ben Nye setting powder and the Laura Mercier Translucent Setting Powder. Quality: I think they are both high quality products. I ordered my Ben Nye powder from Amazon and the sifter didn’t work, but that was the only problem I had quality wise. They both feel like very luxurious products Flashback? Nope. Fine-ness: They are both pretty finely milled. However, I do find the Laura Mercier to be a bit more finely milled. It’s so smooth and almost silly, if that makes sense. When I bake with the Ben Nye Powder, I can actually feel the product on my skin, and the product being “baked” in (which is good – it kinda feels “tight”). I don’t feel that with the Laura Mercier powder and I think it’s because of the finely milled-ness. I also like that the Ben Nye Powder has a slightly pink sheen. The pink is not even noticeable, it’s more of “undertone” type of look. Longevity: I think the Ben Nye powder lasts longer on oily skin than the Laura Mercier does. My face doesn’t really get too shiny when I bake with the Ben Nye. However, it DOES get shiny with the Laura Mercier powder like I normally would. Overall: They are both great powders but the Ben Nye seems to be less finely milled, although it does last longer for oily skin. If you have dry skin, the Laura Mercier is probably not an issue. My skin is REALLY oily by the way so think about that before making a decision. I also really like the color with Ben Nye setting powder (they have other colors as well as a translucent color). What’s your favorite setting powder? I really want to try the Kat Von D powder next! Follow me on Instagram: @sayeedah_

A special person in my life planned a super cute surprise for me! I knew it was something Disney but I wasn’t sure where! Turns out we were going to the cinderella castle! It was such an awesome experience! Since it was a pretty big occasion, I was seriously excited to get all dolled up for this look (I live for the days I get to be extra)! Here’s what I wore: